About Me

My photo
Muthupet, TamilNadu, India
SharePoint 2010

Tuesday, March 11, 2014

Integrating Sharepoint 2010 and SQL Reporting Services 2008 in 6 easy steps


There are only 6 main steps to achieve this task assuming you already have an instance of SQL Server Reporting Services and SharePoint 2010.
I had created this starting from a clean installation of SQL Reporting Services so this guide will discuss the steps on configuring your SQL Reporting Services 2008 for integration with SharePoint 2010.

Step 1: Configuring SQL Reporting Services – Web Service URL

Simply go to Reporting Services Configuration Manager and choose Web Service URL and populate the following needed information. The fields are named properly so I guess there is no need for further explanation. What this does is that it configures the IIS for you depending on what Virtual Directory names you had declared.

Step 2: Configuring SQL Reporting Services – Create a Report Database

Same here, fields need no further explanation except for one which is Native Mode and SharePoint Integrated mode which I will explain below.
Choose create a database or if you already have one choose an existing one. For this example, we will create a new one:

Connect to the database where you want your Report Data to be stored:

Give it a Name and a Report Server Mode.
With SharePoint Integrated Mode the report RDLs are stored on SharePoint and not in the Report Database. For this instance, we will use the SharePoint Integrated Mode:

Specify the credentials that the report server will use to connect to the database.

Review your configuration.

Then wait while it's configured.

Step 3: Configuring SQL Reporting Services – Create a Report Manager URL

What this does is that it configures the IIS for you depending on what Virtual Directory names you had declared.

That’s it. At this point, your report server is configured for SharePoint Integration 2010.

Step 4: SharePoint Integration Configuration – Reporting Services Integration

Simply go to SharePoint 2010 Central Administration, then General Application Settings, then choose Reporting Services Integration.

Now populate the fields using the Web Service URL you had configured a while ago on Step 2 of this guide.

Once done, you will see the Activation State message.

Step 5: SharePoint Integration Configuration – Add a Report Server to the Integration

Now add the report server by putting the Server Name and the Server instance.

At this point it's all done, all you have to do now is try it out.

Step 6: Verify by Checking the Server and Uploading a Report

To verify if it's now integrated, go to Site Settings on your SharePoint Site, then Site Collection Features.


Check if the Report Server Integration Feature is Active, if not just click activate:

Now try to use the SQL Server Reporting Services Webpart:


Or you can also upload a report from a library.

That's it, so simple!

Friday, February 28, 2014

To create a SiteCollection with a host header irrespective of the WebApplication host header

To create a SiteCollection with a host header irrespective of the WebApplication host header
(even if the WebApplication did not have a host header)
Solution:
In PowerShell: New-SPSite http://host.header.site.url -OwnerAlias DOMAIN\username -HostHeaderWebApplication http://servername

Need to add a A record in the DNS.

**If you want to make this work in your dev machine then add a entry in the Hosts file of your SharePoint server.

C:\Windows\System32\drivers\etc\hosts.txt

for example:

127.0.0.1          intranet.c2il.com

Tuesday, February 4, 2014

Using PowerShell to Calculate SharePoint database size

Method 1:

Get-SPDatabase | Sort-Object disksizerequired -desc | Format-Table Name, @{Label ="Size in MB"; Expression = {$_.disksizerequired/1024/1024}} 

This lists all of your databases, from largest to smallest and their size in MBs. Its output looks like this:

Name Size in MB
---- ----------
WSS_Logging 1657
SharePoint_Config 505
Search_Service_Application_PropertyS... 158
SharePoint_AdminContent_9cdc3220-ff2... 99
Search_Service_Application_DB_79408a... 99
WSS_Content 74
WSS_Content_OOTB_upgrade 46
WSS_Content_ac5e33ae4e354dd493b6da17... 26
wss_content_upgrade 26
WSS_Content_portal 24
Search_Service_Application_CrawlStor... 17
User Profile Service Application_Pro... 7
Bdc_Service_DB_a95c44b879ef48f8a5307... 6
WebAnalyticsServiceApplication_Repor... 6
WebAnalyticsServiceApplication_Stagi... 5
Application_Registry_Service_DB_2f70... 4
Managed Metadata Service_c23b61fed61... 3
managed_metadata_the_truth 3
User Profile Service Application_Soc... 3
User Profile Service Application_Syn... 2
StateService_783e168d26fd498b9be3061... 2
Secure_Store_Service_DB_89dc97ed2262... 2
PerformancePoint Service Application... 2
WordAutomationServices_00a4e73d0d734... 2 

That's pretty helpful, but it doesn't answer that burning question, how much space is needed. I came up with this to answer that question:

Get-SPDatabase | ForEach-Object {$db=0} {$db +=$_.disksizerequired; $_.name + " - " + $_.disksizerequired/1024/1024} {Write-Host "`nTotal Storage (in MB) =" ("{0:n0}" -f ($db/1024/1024))}

Its output looked this this:

StateService_783e168d26fd498b9be3061299862269 - 2
Secure_Store_Service_DB_89dc97ed22624025ae6e9a69f2684978 - 2
WordAutomationServices_00a4e73d0d7341cdac915e8247da5211 - 2
User Profile Service Application_SocialDB_f2c646049bfd4456b612e454ac1a73fd - 3
Bdc_Service_DB_a95c44b879ef48f8a53070abd98a9d03 - 6
WebAnalyticsServiceApplication_StagingDB_51bf4216-80fa-45d5-b580-b5d419c8e269 - 5
SharePoint_Config - 505
PerformancePoint Service Application_c575f52198844d46a6c2d29c69a6594a - 2
Search_Service_Application_CrawlStoreDB_6c608154693c412bb9fc1e35235e502f - 17
Search_Service_Application_PropertyStoreDB_d7726abcc15f425eb39428f3d6d983d4 - 158
Application_Registry_Service_DB_2f70cb1bdc274522ac5ca345df9de86e - 4
SharePoint_AdminContent_9cdc3220-ff2c-4b52-abcf-ad9ce1ba463d - 99
WSS_Content - 74
WSS_Content_ac5e33ae4e354dd493b6da176e9e6c84 - 26
WSS_Content_OOTB_upgrade - 46
WSS_Content_portal - 24
wss_content_upgrade - 26
Search_Service_Application_DB_79408a739be74c18ac0b44630382b13c - 99
Managed Metadata Service_c23b61fed6114e88af70931a2add3c36 - 3
managed_metadata_the_truth - 3
User Profile Service Application_ProfileDB_15a709d2085741fb9ed182d6e77e2a4f - 7
WSS_Logging - 1654
User Profile Service Application_SyncDB_9ff01258380945d99a5c9e8e110b6835 - 2
WebAnalyticsServiceApplication_ReportingDB_c7b9b6b2-f3d7-40c4-b72f-70a47e78deec – 6

Total Storage (in MB) = 2,775 

Method 2:

#Get SharePoint Content database sizes Add-PSSnapin Microsoft.SharePoint.PowerShell -ErrorAction SilentlyContinue
$date = Get-Date -Format "dd-MM-yyyy"
#Variables that you can change to fit your environment
$TXTFile = "D:\Reports\SPContentDatabase_$date.txt"
$SMTPServer = "yourmailserver"
$emailFrom = "SharePointReports@company.com"
$emailTo = "youradmin@company.com"
$subject = "Content Database size reports"
$emailBody = "Daily/Weekly/Monthly report on Content databases"
$webapps = Get-SPWebApplication
foreach($webapp in $webapps)
{
    $ContentDatabases = $webapp.ContentDatabases
    Add-Content -Path $TXTFile -Value "Content databases for $($webapp.url)"
    foreach($ContentDatabase in $ContentDatabases)
    {
    $ContentDatabaseSize = [Math]::Round(($ContentDatabase.disksizerequired/1GB),2)
    Add-Content -Path $TXTFile -Value "-     $($ContentDatabase.Name): $($ContentDatabaseSize)GB"
    }
}
if(!($SMTPServer) -OR !($emailFrom) -OR !($emailTo))
{
Write-Host "No e-mail being sent, if you do want to send an e-mail, please enter the values for the following variables: $SMTPServer, $emailFrom and $emailTo."
}
else
{
Send-MailMessage -SmtpServer $SMTPServer -From $emailFrom -To $emailTo -Subject $subject -Body $emailBody -Attachment $TXTFile
}
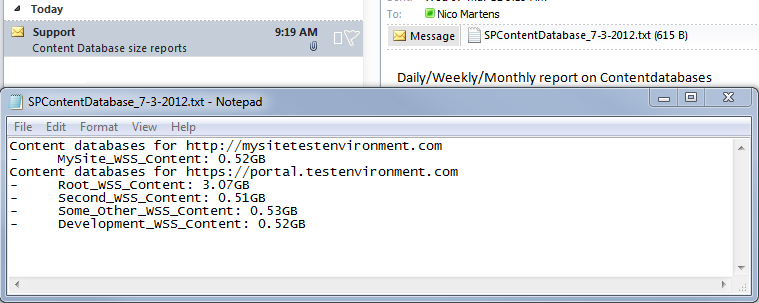
The result
image
Scheduling the script
Save the script (In my example: C:\Install\Get-SPContentDatabaseSize.ps1)
Start the Task scheduler: Start –> Run: taskschd.msc Create a new task:
image
General
image
- Make sure the account running the task has sufficient permissions to access the databases
- “Run whether user is logged on or not” should be checked.
- Run with highest privileges has to be checked.
Triggers
image

The triggers can be set to your requirements, in this example I scheduled the task weekly at 6PM.
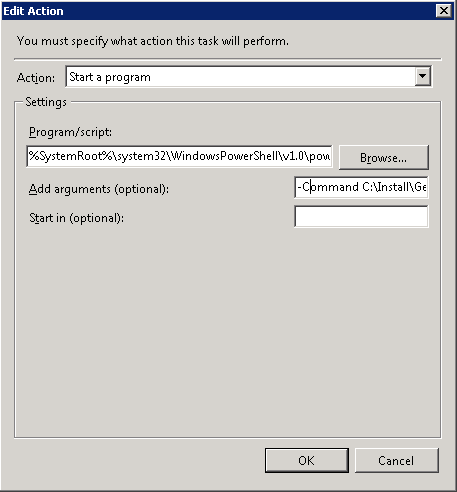
Actions To run a PowerShell script as a scheduled task, you cannot simply add the C:\Install\Get-SPContentDatabaseSize.ps1 in the “Program/script” field.
You should do the following:
image
Program/script: %SystemRoot%\system32\WindowsPowerShell\v1.0\powershell.exe
Add arguments (optional): -Command C:\Install\Get-SPContentDatabaseSize.ps1
 

Thursday, January 30, 2014

SharePoint Server 2010 Service Pack 2 has been released (Updated July 31st, 2013)

Service Pack 2 for the SharePoint 2010 Product Family has been released today.
Below you can find the KB and download links:
SharePoint Server 2010 SP2KB268745364-bit
Office Server Language Pack SP2KB268746264-bit
SharePoint Foundation 2010 SP2KB268746464-bit
SharePoint Foundation 2010 Language Pack SP2KB268746664-bit
FAST Search Server 2010 for SharePoint SP2KB268744664-bit
Office Web Apps 2010 SP2KB268747064-bit
Project Server 2010 SP2KB268745264-bit
Search Server 2010 SP2KB268746164-bit
SharePoint 2010 Indexing Connector for Documentum SP2KB268745964-bit
SharePoint Designer 2010 SP2KB268746332-bit64-bit
SharePoint Foundation 2010 Client Object Model Redistributable SP2KB268746732-bit64-bit

Apply August 2010 Cumulative Update on SharePoint Server 2010

Time to patch up… 
Aug CU 2010 released, it is very simplified form this time than the June CU 2010. There are full packages available for each product.
Check our KB articles for getting more information about what are the fixes available and the modified files information.
  • KB 2352346 - SharePoint Foundation 2010
  • KB 2352342 - SharePoint Server 2010
  • KB 2352345 - SharePoint Server 2010 with Project Server
As you see there is a separate Full Server Package for SharePoint Server 2010 with Project Server which simplifies patching of this common installation.
The Full Server Packages for August 2010 CU can be downloaded here:
In this post, I am going to walkthrough how we can install August CU 2010 in our SharePoint Server 2010 farm. I have a very small farm (test environment)
1 WFE , 1 Application Server and another server with DC and SQL Server. (OS : Windows 2008 R2 Ent Edition)
RTM Version : 14.0.4763.1000
Once we apply August CU 2010 the new version would be: 14.0.5123.5000
I have installed 4 language packs (Hindi, Arabic, Spanish & Japanese) and Office Web Access in my SharePoint Server 2010 Farm.
As you can see SharePoint Server 2010 CU full package coming with patches for SharePoint Foundation 2010, so no need to install SharePoint Foundation 2010 August CU before applying SharePoint Server 2010 August CU.
If you are applying the patch in the production farm, plan it properly and backup the DBs before applying the patch.
Let’s start….
1.       Install the bits in all SharePoint servers by double clicking office-kb2352342-fullfile-x64-glb.exe , do not run the Post Setup Configuration immediately after the installation in a server farm. If installation of bits are not completed in all servers, once we try to run the PSConfig wizard it will detect that and it won’t continue. So make sure that all servers are installed with the Aug CU 2010 bits.
 image
2.       After installing the bits in each server, run the Post Setup Configuration Wizard in the Application server. In SPS 2010 you can even run the PSConfig wizard parallel in all SharePoint Servers. In behind it is not updating each server parallel, instead each server will wait for other servers to complete the update by making a lock in it, once other servers are done with the update the lock will release and it will continue with the upgrade.  
Eg: see the screen shot below: 
   clip_image001 
3.       After completing all tasks of PSConfig setup in all servers it will open the SharePoint central administration website. In my test environment the PSConfig failed at 10th step with an error says that it can’t get the resource information of one language pack. I was able to fix it by running the PSConfig in the command line. 
14\Bin>PSConfig.exe –cmd upgrade –inplace b2b –wait -force 
Whenever we use PSConfig wizard , it will issue a timer job to do the upgrade, notice that in the command line version there are two parameters –wait and –force, -wait means do not issue a timer job instead do the upgrade directly, -force will remove any timer jobs stuck while running PSConfig wizard previously.  
Below screenshot is how it will look like. 
   clip_image002 
If there are any issues you will get more information about the exact exception from the PSConfig Setup logs from the 14/logs/ folder.
4.       Next step is validating the installation. First check the version number of your SharePoint Server farm. 
a)       Open Central Administration à System Settings à Manage Servers in this farm (under servers ) 
Like the below screen shot, this page will list out all servers with the details of language packs, services and the configuration database version which will be: 14.0.5123.5000. Status column will inform you whether we need any further action or not in any of the servers (eg: if you haven’t run the PSConfig wizard) 
                        clip_image004 
b)       Next step is checking the upgrade status.
Central Administration à Upgrade and Migration à Check upgrade status.
We can see that my app server was failed once but succeeded later.  
clip_image006 
c)       Next step is review the database status  
Central Administration à Upgrade and Migration à Check upgrade status.  
Here we can double check and confirm whether any databases are need to be upgraded.  
clip_image008 
d)       Next step is check the product and patch installation status  
Central Administration à Upgrade and Migration à Check product and patch installation status. This is really new status page in 2010 and here we can see the old version and new version of each installed components.
                        clip_image010
e)       Run Stsadm –o localupgradestatus to get the complete information for successful upgraded site collections. You have to run it as an administrator in all SharePoint Servers in the farm.
                        clip_image011
f)        Once all tests are done then test SharePoint sites, service applications etc.  
For more information:  
Verify the upgrade status and do a smoke test : http://technet.microsoft.com/en-us/library/cc424972.aspx
strongly recommend to follow the link for planning and installing updates for SharePoint 2010 : http://technet.microsoft.com/en-us/sharepoint/ff800847.aspx 
Happy patching...

-Saravanan.J

Monday, January 6, 2014

Correlation ID using Powershell

Correlation ID, what’s that?
In SharePoint 2010, you get a Correlation ID (which is a GUID) attached to your logs/error messages when something happens. This ID can then be used to lookup that specific error from the logs.
This Correlation ID is used per request-session in SharePoint 2010, and if you are in the process of requesting some information from SharePoint and bump into some problems along the way – your Correlation ID will be the best starting point for searching for what went wrong along that request!
You might get an error message like this in SharePoint 2010 (don’t worry, if you haven’t seen one like this one yet – just hang in there, sooner or later you will.. )

image

Search for the log messages based on the Correlation ID token
So if you’ve gotten such an error message and want to find out more information about the actual error and don’t have the time to go around poking in the logs and searching – there’s a few methods you can do this rather easily, as described below.

Using PowerShell to lookup a log message based on Correlation ID token

One of the quick-n-awesome ways to do this is to simply hook up a PowerShell console (SharePoint 2010 Management Shell) and then just write the following command (replace the <GUID> with the Correlation Id):

    get-splogevent | ?{$_Correlation -eq "<GUID>" }

This will give you the details about your specific error like this in the console:
image
image
You might want to be more precise and get more specific details out of your query, then you can try something like this:

    get-splogevent | ?{$_.Correlation -eq "<GUID>"} | select Area, Category, Level, EventID, Message | Format-List

This will give you the details about your specific error like this with some juicy details:
image
image
Finally if you would want these messages to be put into a text or log file instead, you could just add the classic “> C:Awesome.log” after the command like this:

    get-splogevent | ?{$_.Correlation -eq "<GUID>"} | select Area, Category, Level, EventID, Message | Format-List > C:Awesome.log

image
image
On MSDN they have an overvoew of using SP-GetLogEvent which I would recommend!
- See more at: http://zimmergren.net/technical/sp-2010-find-error-messages-with-a-correlation-id-token-in-sharepoint-2010#sthash.gkazJbvv.dpuf

Wednesday, December 18, 2013

How to print data from gridview control using asp.net with c#


hi,
try this code

Javascript function to print.
<script language="javascript" type="text/javascript">
    function CallPrint()
    {
        var prtContent = document.getElementById("divPrint");
        var WinPrint = window.open('','','letf=0,top=0,toolbar=0,scrollbars=0,status=0');
        WinPrint.document.write(prtContent.innerHTML);
        WinPrint.document.close();
        WinPrint.focus();
        WinPrint.print();
        WinPrint.close();
    }
</script>

Print Button
<asp:Button ID="btnprint" runat="server" Text="Print" OnClientClick="javascript:CallPrint();" />

GridView to Print
<div id="divPrint" style="text-align: center; width: 100%">
    <asp:GridView ID="GView" runat="server">
        <Columns>
.....
</Columns>
    </asp:GridView>
</div>